This topic describes how to connect your AWS, Azure, GCP and OCI environments to Sysdig Secure. Click a tab below to select the platform you want to set up. You can connect Single Accounts or entire Organization Accounts using Terraform or CloudFormation.
- AWS
- Azure
- GCP
- OCI
AWS
1. Prerequisites
- A Sysdig Secure administrator account.
- An AWS user or role with permission to install IAM policies, as shown in the table below.
- A local workstation with Terraform v1.5+ installed or access to CloudFormation.
Click to Learn More About Using Terraform and AWS CLI
Click to Learn More About IAM Permissions
2. Collect Your Account Details
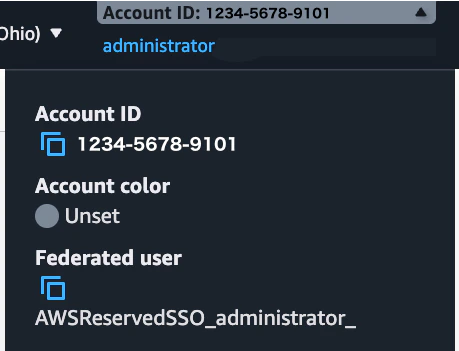
- Sign in to the AWS Console. For an Organization, ensure you sign in to your organization’s management account.
- Expand the dropdown in the top right corner of the AWS Console and copy your Account ID.You can also get your AWS AccountID by using this command via AWS CLI or the AWS Console terminal:
aws sts get-caller-identity \ --query Account \ --output text - Optional Organization Unit IDs. By default, your entire AWS Organization will be onboarded. If you want to restrict onboarding to a subset of your Organization, you can gather specific OUIDs now and enter them in the following steps.
3. Connect with Terraform
1
Log in
Log in to Sysdig Secure.
2
Click Integrations
Click Integrations at the bottom of the main left-hand navigation menu, and choose AWS Cloud Accounts.
3
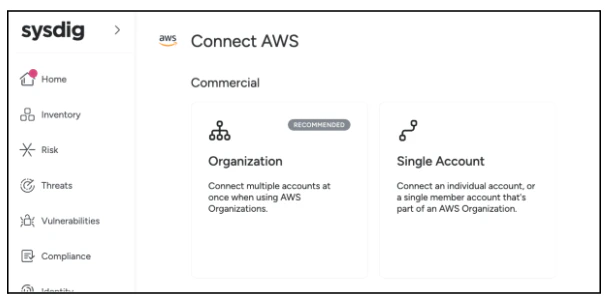
Choose account type
Choose whether to connect an AWS Organization or a Single Account.
4
Enter IDs and region
For Organization accounts, In Step 2, enter your AWS management Account ID and select your Primary Region. For Single Accounts, enter only your AWS Account ID.
5
Enter OUIDs
In Step 3, you can onboard a subset of your Organization Accounts by entering the OUIDs in a comma-separated list. Leave the field blank to onboard your entire Organization.
6
Generate Terraform file
In Step 4, click the Next button to generate a main.tf file to use with Terraform. Copy its contents and paste them into a new file, or download the file to an empty folder on your workstation, such as /home/user/sysdig_onboarding.
7
Execute Terraform
- On your workstation, navigate using the CLI to the folder containing your main.tf file and execute the following commands:
$ cd /home/user/sysdig_onboarding   # Your main.tf file location
$ terraform init && terraform apply
8
Complete Onboarding
- When Terraform completes, click the Complete Onboarding button in the Sysdig Secure dashboard. Your newly added account will appear in the Cloud Accounts page.
4. Connect with CloudFormation
- Log in to Sysdig Secure.
- In a separate browser window, log in to your AWS Account. For Organization installs, be sure to log into your Organization’s Management Account.
- For Organization accounts, in Step 2, enter your AWS management account ID and your OUID(s). For a Single Account, enter only your AWS Account ID.
- In Step 3, click the Launch Stack button. This will shift you to an AWS console browser window. Follow any prompts in AWS to deploy the required resources, and be sure to check the Acknowledgements in the AWS Capabilities section.
- When CloudFormation completes, click the Complete Onboarding button in the Sysdig dashboard. Your newly added account will appear in the Cloud Accounts page.
5. Check the Connection
- To validate your AWS connection, navigate to Sysdig Secure’s Integrations > Environments > AWS.
- Click the Added On column heading to show the most recently added account on top.
- The Status column shows the overall connection status:
- Connected
- Error
- Needs Attention
- Unknown
Select the desired AWS account to review the individual services in the detail drawer. There you can view the status of each feature you’ve enabled.
See an Example of the Health Status for CSPM
Further Reading
Learn More About Permissions
Learn More About Identies Shared with Sysdig
(Original: https://docs.sysdig.com/en/sysdig-secure/connect-aws/)
AWS
1. Prerequisites
- A Sysdig Secure administrator account.
- An AWS user or role with permission to install IAM policies, as shown in the table below.
- A local workstation with Terraform v1.5+ installed or access to CloudFormation.
Click to Learn More About Using Terraform and AWS CLI
Click to Learn More About IAM Permissions
2. Collect Your Account Details
- Sign in to the AWS Console. For an Organization, ensure you sign in to your organization’s management account.
- Expand the dropdown in the top right corner of the AWS Console and copy your Account ID.You can also get your AWS AccountID by using this command via AWS CLI or the AWS Console terminal:
aws sts get-caller-identity \ --query Account \ --output text - Optional Organization Unit IDs. By default, your entire AWS Organization will be onboarded. If you want to restrict onboarding to a subset of your Organization, you can gather specific OUIDs now and enter them in the following steps.
3. Connect with Terraform
1
Log in
Log in to Sysdig Secure.
2
Click Integrations
Click Integrations at the bottom of the main left-hand navigation menu, and choose AWS Cloud Accounts.
3
Choose account type
Choose whether to connect an AWS Organization or a Single Account.
4
Enter IDs and region
For Organization accounts, In Step 2, enter your AWS management Account ID and select your Primary Region. For Single Accounts, enter only your AWS Account ID.
5
Enter OUIDs
In Step 3, you can onboard a subset of your Organization Accounts by entering the OUIDs in a comma-separated list. Leave the field blank to onboard your entire Organization.
6
Generate Terraform file
In Step 4, click the Next button to generate a main.tf file to use with Terraform. Copy its contents and paste them into a new file, or download the file to an empty folder on your workstation, such as /home/user/sysdig_onboarding.
7
Execute Terraform
- On your workstation, navigate using the CLI to the folder containing your main.tf file and execute the following commands:
$ cd /home/user/sysdig_onboarding   # Your main.tf file location
$ terraform init && terraform apply
8
Complete Onboarding
- When Terraform completes, click the Complete Onboarding button in the Sysdig Secure dashboard. Your newly added account will appear in the Cloud Accounts page.
4. Connect with CloudFormation
- Log in to Sysdig Secure.
- In a separate browser window, log in to your AWS Account. For Organization installs, be sure to log into your Organization’s Management Account.
- For Organization accounts, in Step 2, enter your AWS management account ID and your OUID(s). For a Single Account, enter only your AWS Account ID.
- In Step 3, click the Launch Stack button. This will shift you to an AWS console browser window. Follow any prompts in AWS to deploy the required resources, and be sure to check the Acknowledgements in the AWS Capabilities section.
- When CloudFormation completes, click the Complete Onboarding button in the Sysdig dashboard. Your newly added account will appear in the Cloud Accounts page.
5. Check the Connection
- To validate your AWS connection, navigate to Sysdig Secure’s Integrations > Environments > AWS.
- Click the Added On column heading to show the most recently added account on top.
- The Status column shows the overall connection status:
- Connected
- Error
- Needs Attention
- Unknown
Select the desired AWS account to review the individual services in the detail drawer. There you can view the status of each feature you’ve enabled.
See an Example of the Health Status for CSPM
Further Reading
Learn More About Permissions
(Original: https://docs.sysdig.com/en/sysdig-secure/connect-aws/)